The following assumes you already have a certain familiarity with GWT, the use of Eclipse and writing Java: if you are a complete newbie, I encourage you to go through the GWT Tutorials, before coming back here.
The problem statement for this entry is one that ought to be familiar to most folk who have been doing GWT development for some time: you realise that a few of the classes and widgets you have created would be of use in several projects, but are unhappy with "copy & paste programming," a most awful practice indeed.
This recently happened to me: I have developed a "grid-based view" UI element (essentially a wrapper around GWT's Grid widget, with such functionality, so as to elevate it from humble Widget, to fully-fledged View status). Without wanting to enter too much into the detail (perhaps a subject for another blog post), the usage of the View is based around a View interface:
package com.alertavert.gwt.client.ui.views;

public interface View extends AlertableOnActivationView {
  /**
   * Each view is expected to be able to render itself.
   * This method can be called at any time on the view, even if it's not
   * visible/enabled
   */
  public void render();

  /**
   * The main client area (Panel) where this view is being rendered
   *
   * @return  a {@link Panel} that contains this view's {@link Widget}s
   */
  public Panel getMainPanel();

  /**
   * The main framework will call this method to set the main client area where the
   * view has to render itself.
   * There is no guarantee about when this method will be called, or even that it will
   * be called at all.
   * Always check for a main panel that is {@code null} and, preferably use the
   * {@link #getMainPanel()} to get at it.
   *
   * @param panel the main client area for the view to render itself
   */
  public void setMainPanel(Panel panel);

  /**
   * A user-friendly name for the view, could be used also to uniquely identify it
   *
   * @return a user-friendly name for the view
   */
  public String getName();
}
and an abstract GridBasedView class, that implements the Template Pattern:
// All rights reserved Infinite Bandwidth ltd (c) 2009
package com.alertavert.gwt.client.ui.views;
/**
* Abstracts away from the concrete implementations the common details of a 'grid-based' view:
* essentially a UI element based primarily on a grid-spaced table.
*
* Other elements can be placed either before/after the grid is actually rendered (by using
* {@link #preRender()} and {@link #postRender()}) and the grid itself can be moved around the
* {@link #mainPanel} by manipulating the Panel itself.
*
* All elements of the grid are customasible (to a point) by passing the appropriate labels for
* headings and row titles ({@link #getHeadings()} and {@link #getRowTitles()} must be implemented
* by the concrete classes).
*
* @author Marco Massenzio (m.mmassenzio@gmail.com)
*/
public abstract class GridBasedView implements View, ToggleTextListener {
protected Grid grid;
Panel mainPanel;
/**
* Flag to indicate that individual rows can be deleted by user. The renderer will add a 'delete'
* icon and will handle row deletion
*/
private boolean canDeleteRow = false;
/**
* Flag to indicate that individual columns can be deleted by user. The renderer will add a
* 'delete' icon and will handle column deletion TOOD(mmassenzio) implement functionality
*/
private boolean canDeleteColumns = false;
/*
* Flag to indicate whether the row titles can be edited by user
*/
private boolean canEditRowTitle = false;
/*
* Flag to indicate that individual rows can be added by user. The renderer will add a 'new row'
* icon and will handle row addition
*/
private boolean canAddRow = false;
// A bunch of Setters & Getters follows here
// ...
/**
* Constructs a View based on a Table displayed in the center of the main panel ({@link
* #getMainPanel())}).
* The grid will have (at least initially) (row, col) cells (the number or
* rows can be changed calling {@link #resizeRows(int))}, if you need to change the number of
* columns too, use the methods in {@link Grid}).
*
* @param rows the number of rows
* @param columns the number of columns
*/
public GridBasedView(int rows, int columns) {
grid = new Grid(rows, columns);
}
/**
* Renders this View -- follows the Template pattern calling a number of abstract methods that
* will be customised by the actual, concrete implementations.
*/
public void render() {
if ((!initialized) && (mainPanel != null)) {
renderFirst();
}
}
/**
* Sets the Table's header, given the titles {@code headings}. Titles are set for all the columns,
* starting from the second: in other words, the first column (number 0,
* containing the rows' titles) will not be set.
*
* The "titles' heading" will be set according to {@link #getRowTitles()}'s first returned
* element.
*
* +---------------------+-------+-------+-------+-------+
* | getRowTitles.get(0) | h[0] | h[1] | h[2] | h[3] |
* +---------------------+-------+-------+-------+-------+
* | getRowTitles.get(1) | ...
* +---------------------+-------+-------+-------+-------+
*
* @param headings an ordered List of headings (text only) for this grid
* @see GridBasedView#getRowTitles() getRowTitles
* @see GridBasedView#renderFirstCol(List) renderFirstCol
*/
protected void renderHeader(Listheadings) {
int col = 0;
if (headings != null) {
for (String heading : headings) {
if (++col < grid.getColumnCount())
grid.setText(0, col, heading);
else
break;
}
}
grid.getRowFormatter().setStylePrimaryName(0, Styles.GRIDBASED_HEADER);
}
protected void setHeadingsClickable() {
grid.getRowFormatter().addStyleName(0, Styles.CLICKABLE);
grid.getCellFormatter().addStyleName(0, 0, Styles.NOT_CLICKABLE);
}
protected void setRowsSelectable() {
for (int row = 1; row < grid.getRowCount(); ++row) {
grid.getCellFormatter().addStyleName(row, 0, Styles.CLICKABLE);
}
}
/**
* Renders the first column which is assumed to contain the titles for each row. The grid will be
* resized to match the number of titles passed in: if you want to display more rows than there
* are titles, or need to have intervening empty row titles, just pass {@code null} as that
* particular element of the List.
*
* The first 'title' passed in ({@code rowTitles.get(0)}) will be used as the 'heading' for the
* titles themselves.
*
* @param rowTitles titles for the rows, one for each row; the collection must be non-null itself
* however, the actual titles can and will be represented as empty strings ({@code })
* @throws IllegalArgumentException if rowTitles is null
* @see GridBasedView#renderHeader(List) renderHeader
*/
protected void renderFirstCol(ListrowTitles) {
// lots of widget-manipulation here....
}
/**
* Template pattern - renders the view for the first time (before the view gets
* {@link #initialized}) by calling a sequence of methods that are either {@code abstract} or
* {@code Override}n by the derived classes.
*
* Before actually rendering the grid, {@link preRender()} is called, and after the grid is
* rendered, {@link postRender()} is called, thus giving derived classes the opportunity to add
* other custom widgets to the View (and/or customise the {@link #grid}'s appearance itself).
*/
protected void renderFirst() {
mainPanel.clear();
grid.setStylePrimaryName(Styles.GRIDBASED);
preRender();
renderTable();
mainPanel.add(grid);
postRender();
initialized = true;
}
/**
* Renders the main table ({@link #grid}) that constitutes the central component of this View
*/
protected void renderTable() {
renderHeader(getHeadings());
renderFirstCol(getRowTitles());
fillCells();
}
protected void fillCells() {
String stylePrefix = Styles.GRIDBASED_CELL;
String styleOddRow = stylePrefix + "_odd";
String styleEvenRow = stylePrefix + "_even";
for (int row = 1; row < grid.getRowCount(); ++row) {
// assign a default CSS Style here, can be overridden in the concrete fillCell()
if ((row % 2) == 0)
grid.getRowFormatter().setStylePrimaryName(row, styleEvenRow);
else
grid.getRowFormatter().setStylePrimaryName(row, styleOddRow);
for (int col = 1; col < grid.getColumnCount(); ++col) {
fillCell(row, col);
}
}
}
// =============== Template Methods ============
protected abstract ListgetRowTitles();
protected abstract ListgetHeadings();
protected abstract void preRender();
protected abstract void postRender();
protected abstract void fillCell(int row, int column);
// ... a few other utility methods here to manipulate rows and cells
}

Whatever the merits of the above, let's focus on how we can turn it into a module, so that other projects will be able to re-use it.
The first step is, obviously, to "extract" all the relevant classes and sever any links to any project-specific dependency: that in itself is a good exercise, as it ensures that we have not made any undue assumption about the specific usage of our library module.
The end result is as shown in the 'snapshot' from the Package Explorer here on the left: the module resides in package com.alertavert.gwt and is called GridBased (the GridBasedDemo module is simply a very basic GWT app to demonstrate how to use the GridBasedView; more on that later).
GridBased.gwt.xml itself is very simple:
<module>So far, so good, and so simple.
<inherits name="com.google.gwt.user.User"/>
<inherits name="com.google.gwt.user.theme.standard.Standard"/>
<stylesheet src="gridbased.css"/>
<!--
There is no EntryPoint defined here, as this is inherited by
the external apps that will provide their own entry point.
To run the demo app, use GridBasedDemo.gwt.xml
-->
<module>
However, this is where the interplay between GWT's plugin's inadequacy to handle modules and the fac that really Eclipse has no idea of the concept or turning Java into Javascript, makes matters a tad more complicated.
In fact, GWT's documentation, simply indicates that you ought to package both source (.java) and binaries (.class) in the same JAR, and make it available to the GWT compiler (in other words, add it to the project's classpath).
If you do that, using the module above is trivial to the point of banality; this is a simple definition for a 'demo' project (totally separate from the one above) that uses my GridBased module (notice the "Other module inherits" entry)
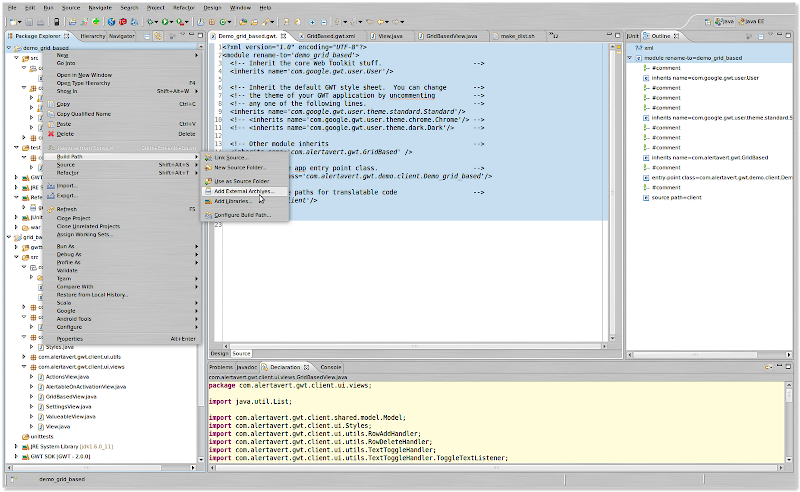
<?xml version="1.0" encoding="UTF-8"?>Assuming that you have GridBased.jar in your filesystem, all you have to do in Eclipse is to right-click on the Project's folder in the Package Navigator, select Add External Libraries, and then point to the newly-minted jar:
<module rename-to='demo_grid_based'>
<!-- Inherit the core Web Toolkit stuff. -->
<inherits name='com.google.gwt.user.User'/>
<!-- Inherit the default GWT style sheet. -->
<inherits name='com.google.gwt.user.theme.standard.Standard'/>
<!-- Other module inherits -->
<inherits name='com.alertavert.gwt.GridBased' />
<!-- Specify the app entry point class. -->
<entry-point class='com.alertavert.gwt.demo.client.Demo_grid_based'/>
<!-- Specify the paths for translatable code -->
<source path='client'/>
</module>

So, I hear you asking, how do you go about creating the JAR file in the first place.
One option, obviously, would be to use Eclipse's built-in jar builder (File > Export... > Jar file) and select the necessary and desired .class files, checking the "Export Java source files and resources" option.
However, I found that option to work not too well for me, and also rather cumbersome to remove the unit test class files from the generated jar.
So I resorted to this simple shell script to hand-craft my jar, adding the necessary .java and .class files, whilst removing all unit tests:
#!/bin/bashEven if you don't get all the nuances here, it's pretty clear that I'm gathering all the source (.java) files from src/; all the binaries (.class) from war/WEB-INF/classes (the default place for any GWT application created using Google's plugins); into and removing all test classes and utilities from the dist/ folder and then mashing them all up using jar cvf ... into gridbased_0.1.jar
BASEDIR=/home/marco/workspace-gwt-modules/grid_based
VERSION=0.1
cd $BASEDIR
rm -rf dist
mkdir dist
cp -R src/com/ dist/ && \
cp -R war/WEB-INF/classes/com/* dist/com/ && \
find ./dist|grep -e [a-zA-Z]*Test\.class|xargs rm && \
find ./dist|grep -e Testable.*\.class|xargs rm
cd dist && jar cvf gridbased_${VERSION}.jar com/
(I use ClassNameTestable for those classes that are not quite mocks, but extend some 'genuine' class so that they can expose private/protected members for inspection and manipulation during testing).
And that's pretty much about it: if you then want to use a GridBasedView-derived class to display, for example, a grid where odd-numbered rows have your own custom style, you can do so:
// Copyright AlertAvert.com (c) 2010. All rights reserved.where your own-derived class is inheriting from a class that was defined inside the GridBased module:
// Created 6 Jan 2010, by M. Massenzio (m.massenzio@gmail.com)
package com.alertavert.gwt.demo.client;
import com.alertavert.gwt.client.SimpleGridBasedView;
public class AlternateRowsSimpleGrid extends SimpleGridBasedView {
public AlternateRowsSimpleGrid(int rows, int columns) {
super(rows, columns);
}
@Override
public void fillCell(int row, int column) {
super.fillCell(row, column);
if ((row % 2 == 1) && (column == 1)) {
getGrid().getRowFormatter().setStylePrimaryName(row, "odd_row");
}
}
}
public class SimpleGridBasedView extends GridBasedView {
  // implements all the abstract methods defined in GridBasedView
}
and having the .class files inside the JAR allows Eclipse to do all its magic (including code-completion, snippets and javadoc).Blogged with the Flock Browser