Sunday, January 24, 2010

Writing a GWT Module

The available documentation from http://code.google.com/gwt and other blogs I've researched, is pretty scant on detail about creating and re-using your own GWT module, so I've decided to draft here a few guidelines, highlighting the most likely pitfalls along the path.

The following assumes you already have a certain familiarity with GWT, the use of Eclipse and writing Java: if you are a complete newbie, I encourage you to go through the GWT Tutorials, before coming back here.

The problem statement for this entry is one that ought to be familiar to most folk who have been doing GWT development for some time: you realise that a few of the classes and widgets you have created would be of use in several projects, but are unhappy with "copy & paste programming," a most awful practice indeed.

This recently happened to me: I have developed a "grid-based view" UI element (essentially a wrapper around GWT's Grid widget, with such functionality, so as to elevate it from humble Widget, to fully-fledged View status).  Without wanting to enter too much into the detail (perhaps a subject for another blog post), the usage of the View is based around a View interface:
package com.alertavert.gwt.client.ui.views;

public interface View extends AlertableOnActivationView {
/**
* Each view is expected to be able to render itself.
* This method can be called at any time on the view, even if it's not
* visible/enabled
*/
public void render();

/**
* The main client area (Panel) where this view is being rendered
*
* @return a {@link Panel} that contains this view's {@link Widget}s
*/
public Panel getMainPanel();

/**
* The main framework will call this method to set the main client area where the
* view has to render itself.
* There is no guarantee about when this method will be called, or even that it will
* be called at all.
* Always check for a main panel that is {@code null} and, preferably use the
* {@link #getMainPanel()} to get at it.
*
* @param panel the main client area for the view to render itself
*/
public void setMainPanel(Panel panel);

/**
* A user-friendly name for the view, could be used also to uniquely identify it
*
* @return a user-friendly name for the view
*/
public String getName();
}

and an abstract GridBasedView class, that implements the Template Pattern:

// All rights reserved Infinite Bandwidth ltd (c) 2009
package com.alertavert.gwt.client.ui.views;

/**
* Abstracts away from the concrete implementations the common details of a 'grid-based' view:
* essentially a UI element based primarily on a grid-spaced table.
*
* Other elements can be placed either before/after the grid is actually rendered (by using
* {@link #preRender()} and {@link #postRender()}) and the grid itself can be moved around the
* {@link #mainPanel} by manipulating the Panel itself.
*
* All elements of the grid are customasible (to a point) by passing the appropriate labels for
* headings and row titles ({@link #getHeadings()} and {@link #getRowTitles()} must be implemented
* by the concrete classes).
*
* @author Marco Massenzio (m.mmassenzio@gmail.com)
*/
public abstract class GridBasedView implements View, ToggleTextListener {

protected Grid grid;
Panel mainPanel;

/**
* Flag to indicate that individual rows can be deleted by user. The renderer will add a 'delete'
* icon and will handle row deletion
*/
private boolean canDeleteRow = false;

/**
* Flag to indicate that individual columns can be deleted by user. The renderer will add a
* 'delete' icon and will handle column deletion TOOD(mmassenzio) implement functionality
*/
private boolean canDeleteColumns = false;

/*
* Flag to indicate whether the row titles can be edited by user
*/
private boolean canEditRowTitle = false;

/*
* Flag to indicate that individual rows can be added by user. The renderer will add a 'new row'
* icon and will handle row addition
*/
private boolean canAddRow = false;

// A bunch of Setters & Getters follows here
// ...


/**
* Constructs a View based on a Table displayed in the center of the main panel ({@link
* #getMainPanel())}).
* The grid will have (at least initially) (row, col) cells (the number or
* rows can be changed calling {@link #resizeRows(int))}, if you need to change the number of
* columns too, use the methods in {@link Grid}).
*
* @param rows the number of rows
* @param columns the number of columns
*/
public GridBasedView(int rows, int columns) {
grid = new Grid(rows, columns);
}

/**
* Renders this View -- follows the Template pattern calling a number of abstract methods that
* will be customised by the actual, concrete implementations.
*/
public void render() {
if ((!initialized) && (mainPanel != null)) {
renderFirst();
}
}

/**
* Sets the Table's header, given the titles {@code headings}. Titles are set for all the columns,
* starting from the second: in other words, the first column (number 0,
* containing the rows' titles) will not be set.
*
* The "titles' heading" will be set according to {@link #getRowTitles()}'s first returned
* element.
*
* +---------------------+-------+-------+-------+-------+
* | getRowTitles.get(0) | h[0] | h[1] | h[2] | h[3] |
* +---------------------+-------+-------+-------+-------+
* | getRowTitles.get(1) | ...
* +---------------------+-------+-------+-------+-------+
*
* @param headings an ordered List of headings (text only) for this grid
* @see GridBasedView#getRowTitles() getRowTitles
* @see GridBasedView#renderFirstCol(List) renderFirstCol
*/
protected void renderHeader(List headings) {
int col = 0;
if (headings != null) {
for (String heading : headings) {
if (++col < grid.getColumnCount())
grid.setText(0, col, heading);
else
break;
}
}
grid.getRowFormatter().setStylePrimaryName(0, Styles.GRIDBASED_HEADER);
}

protected void setHeadingsClickable() {
grid.getRowFormatter().addStyleName(0, Styles.CLICKABLE);
grid.getCellFormatter().addStyleName(0, 0, Styles.NOT_CLICKABLE);
}

protected void setRowsSelectable() {
for (int row = 1; row < grid.getRowCount(); ++row) {
grid.getCellFormatter().addStyleName(row, 0, Styles.CLICKABLE);
}
}

/**
* Renders the first column which is assumed to contain the titles for each row. The grid will be
* resized to match the number of titles passed in: if you want to display more rows than there
* are titles, or need to have intervening empty row titles, just pass {@code null} as that
* particular element of the List.
*
* The first 'title' passed in ({@code rowTitles.get(0)}) will be used as the 'heading' for the
* titles themselves.
*
* @param rowTitles titles for the rows, one for each row; the collection must be non-null itself
* however, the actual titles can and will be represented as empty strings ({@code  })
* @throws IllegalArgumentException if rowTitles is null
* @see GridBasedView#renderHeader(List) renderHeader
*/
protected void renderFirstCol(List rowTitles) {
// lots of widget-manipulation here....
}

/**
* Template pattern - renders the view for the first time (before the view gets
* {@link #initialized}) by calling a sequence of methods that are either {@code abstract} or
* {@code Override}n by the derived classes.
*
* Before actually rendering the grid, {@link preRender()} is called, and after the grid is
* rendered, {@link postRender()} is called, thus giving derived classes the opportunity to add
* other custom widgets to the View (and/or customise the {@link #grid}'s appearance itself).
*/
protected void renderFirst() {
mainPanel.clear();
grid.setStylePrimaryName(Styles.GRIDBASED);
preRender();
renderTable();
mainPanel.add(grid);
postRender();
initialized = true;
}

/**
* Renders the main table ({@link #grid}) that constitutes the central component of this View
*/
protected void renderTable() {
renderHeader(getHeadings());
renderFirstCol(getRowTitles());
fillCells();
}

protected void fillCells() {
String stylePrefix = Styles.GRIDBASED_CELL;
String styleOddRow = stylePrefix + "_odd";
String styleEvenRow = stylePrefix + "_even";

for (int row = 1; row < grid.getRowCount(); ++row) {
// assign a default CSS Style here, can be overridden in the concrete fillCell()
if ((row % 2) == 0)
grid.getRowFormatter().setStylePrimaryName(row, styleEvenRow);
else
grid.getRowFormatter().setStylePrimaryName(row, styleOddRow);
for (int col = 1; col < grid.getColumnCount(); ++col) {
fillCell(row, col);
}
}
}

// =============== Template Methods ============
protected abstract List getRowTitles();

protected abstract List getHeadings();

protected abstract void preRender();

protected abstract void postRender();

protected abstract void fillCell(int row, int column);

// ... a few other utility methods here to manipulate rows and cells
}

Whatever the merits of the above, let's focus on how we can turn it into a module, so that other projects will be able to re-use it.
The first step is, obviously, to "extract" all the relevant classes and sever any links to any project-specific dependency: that in itself is a good exercise, as it ensures that we have not made any undue assumption about the specific usage of our library module.

The end result is as shown in the 'snapshot' from the Package Explorer here on the left: the module resides in package com.alertavert.gwt and is called GridBased (the GridBasedDemo module is simply a very basic GWT app to demonstrate how to use the GridBasedView; more on that later).

GridBased.gwt.xml itself is very simple:
<module>
<inherits name="com.google.gwt.user.User"/>
<inherits name="com.google.gwt.user.theme.standard.Standard"/>

<stylesheet src="gridbased.css"/>

<!--
There is no EntryPoint defined here, as this is inherited by
the external apps that will provide their own entry point.
To run the demo app, use GridBasedDemo.gwt.xml
-->
<module>
So far, so good, and so simple.
However, this is where the interplay between GWT's plugin's inadequacy to handle modules and the fac that really Eclipse has no idea of the concept or turning Java into Javascript, makes matters a tad more complicated.

In fact, GWT's documentation, simply indicates that you ought to package both source (.java) and binaries (.class) in the same JAR, and make it available to the GWT compiler (in other words, add it to the project's classpath).

If you do that, using the module above is trivial to the point of banality; this is a simple definition for a 'demo' project (totally separate from the one above) that uses my GridBased module (notice the "Other module inherits" entry)
<?xml version="1.0" encoding="UTF-8"?>
<module rename-to='demo_grid_based'>
<!-- Inherit the core Web Toolkit stuff. -->
<inherits name='com.google.gwt.user.User'/>

<!-- Inherit the default GWT style sheet. -->
<inherits name='com.google.gwt.user.theme.standard.Standard'/>

<!-- Other module inherits -->
<inherits name='com.alertavert.gwt.GridBased' />

<!-- Specify the app entry point class. -->
<entry-point class='com.alertavert.gwt.demo.client.Demo_grid_based'/>

<!-- Specify the paths for translatable code -->
<source path='client'/>

</module>
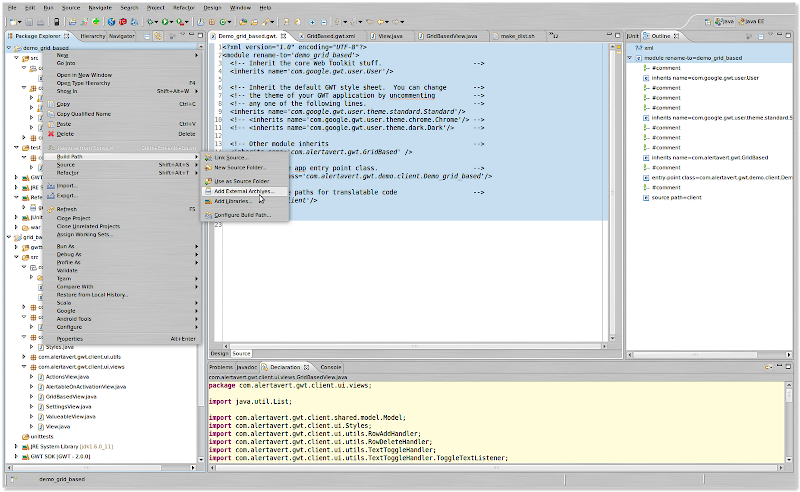
Assuming that you have GridBased.jar in your filesystem, all you have to do in Eclipse is to right-click on the Project's folder in the Package Navigator, select Add External Libraries, and then point to the newly-minted jar:


So, I hear you asking, how do you go about creating the JAR file in the first place.

One option, obviously, would be to use Eclipse's built-in jar builder (File > Export... > Jar file) and select the necessary and desired .class files, checking the "Export Java source files and resources" option.

However, I found that option to work not too well for me, and also rather cumbersome to remove the unit test class files from the generated jar.

So I resorted to this simple shell script to hand-craft my jar, adding the necessary .java and .class files, whilst removing all unit tests:

#!/bin/bash

BASEDIR=/home/marco/workspace-gwt-modules/grid_based
VERSION=0.1

cd $BASEDIR
rm -rf dist
mkdir dist
cp -R src/com/ dist/ && \
cp -R war/WEB-INF/classes/com/* dist/com/ && \
find ./dist|grep -e [a-zA-Z]*Test\.class|xargs rm && \
find ./dist|grep -e Testable.*\.class|xargs rm

cd dist && jar cvf gridbased_${VERSION}.jar com/

Even if you don't get all the nuances here, it's pretty clear that I'm gathering all the source (.java) files from src/; all the binaries (.class) from war/WEB-INF/classes (the default place for any GWT application created using Google's plugins); into and removing all test classes and utilities from the dist/ folder and then mashing them all up using jar cvf ... into gridbased_0.1.jar
(I use ClassNameTestable for those classes that are not quite mocks, but extend some 'genuine' class so that they can expose private/protected members for inspection and manipulation during testing).

And that's pretty much about it: if you then want to use a GridBasedView-derived class to display, for example, a grid where odd-numbered rows have your own custom style, you can do so:
// Copyright AlertAvert.com (c) 2010. All rights reserved.
// Created 6 Jan 2010, by M. Massenzio (m.massenzio@gmail.com)
package com.alertavert.gwt.demo.client;

import com.alertavert.gwt.client.SimpleGridBasedView;

public class AlternateRowsSimpleGrid extends SimpleGridBasedView {

public AlternateRowsSimpleGrid(int rows, int columns) {
super(rows, columns);
}

@Override
public void fillCell(int row, int column) {
super.fillCell(row, column);
if ((row % 2 == 1) && (column == 1)) {
getGrid().getRowFormatter().setStylePrimaryName(row, "odd_row");
}
}
}
where your own-derived class is inheriting from a class that was defined inside the GridBased module:
public class SimpleGridBasedView extends GridBasedView {
  // implements all the abstract methods defined in GridBasedView
}
and having the .class files inside the JAR allows Eclipse to do all its magic (including code-completion, snippets and javadoc).
Blogged with the Flock Browser

Saturday, January 16, 2010

A visual diff for Mercurial

I have already mentioned in the past how much I like Mercurial as a distributed VCS, and how strongly I encourage anyone who is doing development (in team with others, or on your own) to seriously consider adopting it.

However, one of the features I've been greatly missing is a quick way to check which files have been changed between two revisions in a way as simple as the hg status does for the current working directory v. the last committed change: perhaps there is a way (if so, please do let me know) but it's certainly well hidden.

After a bit of tinkering with regular expressions and grep, one can easily come up with the following:
hg diff -g --nodates ${REV1} ${REV2}|grep -E '^\-{3}|^\+{3}'|grep -v '/dev/null'
and get a reasonable (if not terribly readable) list of files changed: there are obviously "duplicates," (they are actually the majority of the list's entries) but one cannot limit the RegEx to just the '- - -' or '+++', as one would miss either the new files or the deleted ones.

I then came across this nice little trick by James Falkner that, in one shot, taught me about Zenity and gave me an idea as to how achieve the optional bonus of being also able to view the changes in tkdiff.

Before we get into the actual script, a very warm recommendation about installing Zenity (why that doesn't come as standard with every Ubuntu install is now beyond me: it is so totally easy to use and mind-blowingly useful that I'm kicking myself for not having discovered it earlier).

In a standard Ubuntu desktop install, you are likely to miss a few packages: gtk+ 2.0, libglade 2.0 and libgnomecanvas 2.0, and it's not obvious which packages contain them: they are, respectively, libgtk2.0-dev, libglade2-dev and libgnomecanvas2-dev.
sudo apt-get install libgtk2.0-dev libglade2-dev libgnomecanvas2-dev
I also recommend installing GTK's documentation, the build-essential package and devhelp (the latter can be found in Applications > Programming and is a simple tool to visualize a wealth of docs and information about various libraries, including GTK+ 2.0 and Libglade):
sudo apt-get install libgtk2.0-doc devhelp build-essential
To install Zenity, the usual drill: unpack the tar file into a directory of your own chosing, then run:
$ ./configure
$ make
$ sudo make install
(note the last command to be run as root, or you won't be able to install the binaries and other files in directories owned by root).

Help about Zenity and examples as how to use it can be found in the standard Gnome Help Centre (there is typically a shortcut in the menu bar at the far right top end, and in the standard Ubuntu theme looks like a lifesaver).

I now have all the bits in place, and the script looks thus:
#!/bin/bash
# Lists the files changed from two revisions
# Usage: hgfiles 50 55
#
# Clones the current repository at -r 50 and -r 55, into two temporary directories, and, optionally, saves
# the SECOND clone in a directory of the user's choosing, possibly after the user has edited the files.
# Uses tkdiff to show the diffs and Zenity to show the dialogs
# See http://codetrips.blogspot.com/ for further information

TMPDIR=/tmp
FILES=$TMPDIR/hg_files.tmp

if [ -n "$1" ]; then
REV1="-r $1"
TMPDIR1=$TMPDIR/clone_$1
else
echo "At least one revision must be specified"
exit -1
fi

if [ -n "$2" ]; then
REV2="-r $2"
TMPDIR2=$TMPDIR/clone_$2
else
zenity --question --width=400 --text="Using current revision for diff: was this expected?"
echo "Zenity says: $?"
if [ $? == 1 ]; then
zenity --error --text="Diff canceled"
exit 0
fi
TMPDIR2=$TMPDIR/clonelatest
fi

hg diff -g --nodates ${REV1} ${REV2}|grep -E '^\-{3}|^\+{3}'|grep -v '/dev/null' > $FILES

FILELIST=`cat $FILES |java -cp /home/marco/bin com.alertavert.simple.HgDiff`

hg clone $REV1 ./ $TMPDIR1
hg clone $REV2 ./ $TMPDIR2

while [ 1 ] ; do
FILE=`zenity --list --width=700 --column="File to show diffs for" $FILELIST`
if [ -z "$FILE" ] ; then
FOLDERCOPY=`zenity --file-selection --directory --save \
--title="Select a folder to save changes"`
case $? in
0)
echo "Folder selected: $FOLDERCOPY" && cp -r --target-directory="$FOLDERCOPY" "$TMPDIR2"/*;;
1)
echo "No folder selected";;
-1)
echo "No folder selected";;
esac
rm -rf $TMPDIR1 $TMPDIR2
exit 0
fi
tkdiff $TMPDIR1/$FILE $TMPDIR2/$FILE
done
Again, not pretty, but it does the job.

The only bit of "mystery" may be that command piped just after the grep:
java -cp /home/marco/bin com.alertavert.simple.HgDiff
but that is a really trivial class to remove the "+++ a/" (or "--- b/" from each of the lines grepped from the output of hg diff:
package com.alertavert.simple;

import java.io.*;

public class HgDiff {
public static void main(String args[]) {
BufferedReader reader = new BufferedReader(new InputStreamReader(System.in));
String line;
try {
while ((line = reader.readLine()) != null) {
if (line.startsWith("+++") || line.startsWith("+++")) {
String trimmedLine = line.substring(6);
System.out.println(trimmedLine);
}
}
} catch(IOException ex) {
// ignore
System.exit(-1);
}
}
}
It's that trivial: there's a reason why it wound up in the 'simple' package...

I could have probably achieved the same effect with some twisting of sed/awk, but honestly, it took me less time to knock this together (it was a strange feeling going back to using gedit and javac, as I really felt that really, just booting up Eclipse to create it would have taken longer!) than even look'em up on Google.

Just remember to change the -cp /home/marco/bin to reflect the folder under which you will install the .class file.
Blogged with the Flock Browser

Wednesday, January 6, 2010

Simple script to add a file or directory to Mercurial's .hgignore

If you use Mercurial as a Source Control Management (SCM) system (and if you don't, then you should seriously ask yourself why) then you have probably grown used to the rather repetitive editing of the .hgignore file, to add files / folders that should not be under version control.

The need is particularly acute if you use IDEs and / or application frameworks, as they both tend to have their own quirky way of arranging files, and most of the folders they use or generate should really not be under source control (especially if you are working with a number of co-workers, who may very well use different IDEs, platforms or even OSes).

The process is rather straightforward: you add a couple of lines (possibly preceded by a comment) to .hgignore, usually specifying the folders to avoid using a RegEx.

Having grown tired of typing this up every time, I decided that a simple shell script was in order[*] to save myself some typing (as Martin Fowler said: "I'm a lazy person: I'm prepared to work pretty hard to save myself work").

The only quirk is that there is a minor difference in the RegEx you want, depending on whether you are trying to ignore a directory or a file (possibly a file pattern, such as all .class files, where you would use something like ".*\.class$" for your RegEx).
The script handles this very simplistically, checking whether the passed parameter corresponds to an existing directory, and, if not, treats it as a straightforward pattern that simply gets copied to .hgignore.

I am positive there may well be a number of corner cases where this all fails abysmally; but in that event, it's probably much simpler to directly edit .hgignore, than trying to ferret out the cleverest possible algorithm.

Here it is, in all its glorious banality: I post it here, just in case others may find it useful (if you do, and find yourself improving on it, please feel free to post back comments with your suggestions).
#!/bin/bash
#
# Simple script to add a folder to the list of those ignored by hg
# Usage: hgignore FOLDER [COMMENT]
#
# Created by M. Massenzio (c) 2010 AlertAvert.com

USAGE="Usage: hgignore FOLDER [COMMENT]"

if [ ! -e .hgignore ]; then
echo "Could not find .hgignore in the current directory:"
echo "are you sure this project is being tracked by HG (Mercurial)?"
echo ""
echo $USAGE
exit -1
fi

if [ ! -z "$2" ]; then
echo "# $2" >> .hgignore
fi

if [ -z "$1" ]; then
echo $USAGE
exit -2
fi

echo "syntax: regexp" >> .hgignore
if [ -d $1 ]; then
echo "^$1\$" >> .hgignore
echo "Added directory $1 to the list of ignored directories in .hgignore:"
else
echo "\\$1\$" >> .hgignore
echo "Added file pattern $1 to the list of ignored files in .hgignore:"
fi
echo "" >> .hgignore

echo "--- Contents of .hgignore ---"
cat .hgignore
echo "--- File ends ---"
[*] I do not even attempt to pretend I know the first thing about shell scripts: however, the above seemed trivial enough that I felt reasonably confident that it should do no harm, despite my n00b-ness.

Blogged with the Flock Browser

Friday, November 20, 2009

More about GWT and Spring

The following was contributed by Yaakov Chaikin (one of the authors of Core Servlets and JavaServer Pages) following some conversations we had regarding an earlier post of mine.
I am only too happy to post it here, with many thanks to Yaakov for taking the time for drafting it.


Let me share one more thing with the readers of Marco's blog. Marco mentioned that he was looking for a more general approach to wiring Spring beans into GWT RPC servlets, so I'd like to offer one.

First, let's explain the basic problem as I understand it. Servlets and Spring beans live in different worlds.

Servlets' lifecycle (when they are created, loaded into memory, initialized, invoked, etc) is controlled by the container (your server). Spring bean's lifecycle is controlled by Spring. So, what does it mean? Well, let me give you an example of what can't be done as a result of this, no matter how you decide to load the Spring's config file and initialize Spring application context:

public class SomeServlet extends HttpServlet {
  @Autowired
  private SomeServiceInterface someService;

  public void doGet(.....)
}

Why won't @Autowired work here? Because for it to work you need Spring to instantiate SomeServlet. Unfortunately, this is not (at least as far as I know, not yet) possible. It's the server's job (according to the spec) to control the lifecycle of SomeServlet and therefore it
gets to decide when to create this class and make it available for requests.

So, you are left with few choices here. Fortunately, Spring helps you out quite a bit here. First, let's look at a way to load Spring configuration without having to write any code. For that, use the
following configuration in your web.xml:

<context-param>
  <param-name>contextConfigLocation</param-name>
  <param-value>classpath:/config.xml<</param-value>
</context-param>

<listener>
  <listener-class>
     org.springframework.web.context.ContextLoaderListener
  </listener-class>
</listener>

Now, you can use the following code in just about any web component that has access to the ServletContext (like a servlet) and pull out the Spring context:

import org.springframework.web.context.WebApplicationContext;
import org.springframework.web.context.support.WebApplicationContextUtils;
...
...
ServletContext servletContext = getServletContext();
WebApplicationContext springContext =
WebApplicationContextUtils.getWebApplicationContext(servletContext);
...

Back to GWT... So, if you want to stop there, you can use the code above in your GWT RPC servlet's init() method (remember, init() will be called only once per servlet and there is only one instance of the servlet ever created by the container, handling all requests in a different thread):

public class MyGWTServlet extends RemoteServiceServlet implements MyService {
  private SomeServiceInterface someService;

  public void init() {
    ServletContext servletContext = getServletContext();
    WebApplicationContext springContext =
        WebApplicationContextUtils.getWebApplicationContext(servletContext);

    someService = (SomeServiceInterface)
        springContext.getBean("someServiceBeanId");
  }
  ...
  ...
}

In my example, "someServiceBeanId" better be configured as a singleton and be thread safe or we would have a serious multi-threading problem on our hands.

However, personally, I didn't want to stop here since I really like the idea of @Autowired together with @Service, @Component, etc.
One huge reason for this is that I use these in such a way that when I stand up my application I will know right away whether or not I messed something up in my code as far as using the Spring configured beans.

For an example of how things can go wrong, consider the servlet code above. Say, I mistyped "someServiceBeanId" and spelled it 'id' (with the lower case i). What would happen when I deploy my web application? Nothing!

Everything would be just fine: no warnings, no errors. I start using my app and everything is still fine. That is until I happen to use some functionality that happens to use that particular GWT RPC servlet. Only then will I be surprised to see a NoSuchBeanDefinitionException. Personally, I'd rather know at deployment time that something is messed up. And the fact that I deploy my web app regularly during development will point out the problem rather quickly.

So, here is the solution that I use:

First, create a SpringRegistry class which looks roughly like this:

@Component
public class SpringRegistry {
public static final String KEY = "springRegistry";

@Autowired
private SomeServiceInterface someService;

@Autowired
private SomeOtherServiceInterface someOtherService;

@Autowired
...

public SomeServiceInterface getSomeServiceInterface() {
return someService;
}

public SomeOtherServiceInterface getSomeOtherServiceInterface() {
return someOtherService;
}

...
}


Now that we have a central bean that can autowire our services, we can define another ServletContextListener to populate that bean in one place. The code for that would look roughly like this:

public class SpringRegistryInitializer implements ServletContextListener {
  /**
   * Spring framework's autogenerated name for the SpringRegistry

      *   component define above.
   */

  private static final String SPRING_REGISTRY_CONFIG_NAME = "springRegistry";

  @Override
  public void contextInitialized(ServletContextEvent event) {
    ServletContext servletContext = event.getServletContext();
    WebApplicationContext springContext =
        WebApplicationContextUtils.getWebApplicationContext(servletContext);

    // Manually retrieve spring registry from spring context
    SpringRegistry springRegistry = (SpringRegistry)
        springContext.getBean(SPRING_REGISTRY_CONFIG_NAME);


    // Store SpringRegistry in servlet context for all web components
    // to be able to retrieve it
    servletContext.setAttribute(SpringRegistry.KEY, springRegistry);
  }

  @Override
  public void contextDestroyed(...) {}
}

ServletContextListener will now make sure that we are autowiring all of my services right from web application initialization (which is before any requests can be accepted by the spec.)

However, we must now remember to configure our new listener in web.xml and we must place our configuration somewhere after our configuration of Spring's ContextLoaderListener.
This is because our listener depends on the Spring context to be already initialized and according to the servlet spec the listeners will be executed in the order they are defined in web.xml.

If you don't want to worry about this condition, you can always do the Spring context loading yourself inside that same SpringRegistryInitializer, but it seems cleaner to me to use the already Spring provided SpringContextLoaderListener.
So, here is how our web.xml will look now:

<context-param>
  <param-name>contextConfigLocation</param-name>
  <param-value>classpath:/config.xml<</param-value>
</context-param>

<listener>
  <listener-class>org.springframework.web.context.ContextLoaderListener</listener-class>
</listener>

<listener>
  <listener-class>yourpackage.SpringRegistryInitializer</listener-class>
</listener>

Finally, the code in our GWT RPC servlet can look like this:
public class MyGWTServlet extends RemoteServiceServlet implements MyService {
private SomeServiceInterface someService;

public void init() {
SpringRegistry registry = (SpringRegistry)
getServletContext().getAttribute(SpringRegistry.KEY);

someService = registry.getSomeService();
}
...
...
public void doSomeOperation(....) { //use someService here }
}
Note, once again, that someService better be configured as a singleton and be thread safe or we would have a serious multi-threading problem on our hands.
Also, note that this approach gives you a nice clean separation between Spring and your web application code.

In your servlet or other web component's code you are no longer even retrieving the Spring configured bean through using using the bean's configured ID. It's all hidden from your servlet code inside the SpringRegistry class.

If, for whatever reason, you don't like or are not able to use @Autowired, etc., you can still use this approach and get the benefits of making sure you that if you make a mistake, it will be clear at the first time you deploy to a web container (server).
Just remove all that autowired stuff and inside your SpringRegistry provide setters for the services and use Spring SETTER injection in your Spring config file.

You'll get the same effect.

Sunday, November 8, 2009

rsync on an SSHFS mount point

Turns out that
"If you plan [to] use rsync to sync files from your local machine to your ssh-server, you need "workaround=rename"
Otherwise, you will not be able to update an older version of a file with a newer one. Without this option, you will be able to create files and folders and delete them, but you will get an error like this, if you try to update a file:
rsync: rename "/path/to/file.Q3Btvn" -> "to/file": Operation not permitted (1)

The original entry was from a comment to this entry in Ubuntu Forums; reporting it here, as it was driving me insane (been wasting quite some time trying to figure whether it was a permission issue).

The complete /etc/fstab entry in my system looks something like:
# This mounts the entire filesystem of server on /mnt/server mountpoint
# Use with care!
sshfs#marco@server:/ /mnt/server fuse users,auto,workaround=rename 0 0

However, if you are mounting a Samba file server, and the path contains spaces, beware of the escape code for that being different from the URL one (%20) or the console (\ followed by space; as in: /fileserver/My\ Pictures).

/etc/fstab requires the \040 escape code to mount a filesystem with spaces in its pathname:
# This mounts the Samba share My Pictures on the NFS server 
#fileserver under /media/pictures
//fileserver/My\040Pictures/ /media/pictures cifs user=guest,password=,iocharset=utf8,file_mode=0777,dir_mode=0777 0 0

Sunday, November 1, 2009

Why hashCode() matters

If you have ever overridden the equals() method of Object in your class code (and who hasn't?) you will obviously also re-implemented hashcode() too, following the (ominously scary) warning in the Javadoc of equals():

Note that it is generally necessary to override the hashCode method whenever this method is overridden, so as to maintain the general contract for the hashCode method, which states that equal objects must have equal hash codes.

Or perhaps not.

The reality is that we developers can be lazy, and sometimes laziness leads to making one assumption too many... such as that, having a sensible implementation of equals() somehow alleviates from the need of re-implementing hashCode() too.

Well, if you are like me, and you haven't heeded Sun's advice, then it's worth noting that this will soon or later bite you, and possibly pretty hard (and, I'd guess rather sooner than later...).

The reason is that the Collections framework make pretty heavy use of hashCode() to speed up such mundane matters as objects lookup and matching; unsurprisingly, especially so in the heavily-used implementation classes such as HashMap and HashSet.

In particular, the contains() method of either Collections will not do an asinine sequential sweep of the entire collection (if the concrete implementation is based directly or indirectly on either of the above two classes) using an equals() test on each element, returning true the first time an equal (in the sense defined by your implementation of equals()) element is encountered, or false otherwise.

Sun's implementation will instead use hashCode() to 'hit' the first possible 'bucket' where the element would have been stored by the HashSet, and, upon finding it (possibly) empty, it will simply assume that the Set does not contain the given element, even though an element that would have been equal (in the sense as defined by your implementation of equals()) is indeed someplace else inside that Set's internal implementation storage.

So, if you do plan to use the Collection framework with your newly-minted class, which you have implemented equals() for, then do yourself a favour and implement a suitable hashCode() too.
In fact, I suggest you do so even if you don't plan to use Collections of those objects: you know Sod's Law, now, don't you?

(and, no, there is no prize in guessing how I found out...)

Sunday, September 27, 2009

Mounting SSHFS drives in Ubuntu

If you have a remote file server that you usually access via SSH, it is extremely simple to mount a directory on your 'local' filesystem (many applications will not allow you to 'browse' to network drives when looking for files to open).

You can simply add the following to /etc/fstab (remember to mkdir -p /path/to/dir and chown it to yourself):
# sshfs (see http://ubuntuforums.org/showthread.php?t=270806)
# The lines below will NOT mount the directories automatically - use: mount /path/to/dir (no need to sudo)
# To mount an arbitrary directory use: sshfs myserver:/remote/dir /path/to/dir
sshfs#marco@myserver:/media/data/shared/media /media/multimedia fuse users,auto 0 0
executing mount /media/multimedia will make all files on myserver located in /media/data/shared/media visible (assuming user `marco` on myserver has the right permission).

To avoid having to type a password each time you mount that directory, I recommend to create a public/private key-pair (there are a number of good tutorials about how to do this, you can see http://pkeck.myweb.uga.edu/ssh/) which you will need anyway for the next step.

Mounting automatically when starting Gnome

Unlike all the other mountpoints defined in /etc/fstab, and despite the `auto` option, the sshfs ones will not mount at boot (I suspect that that is because /etc/fstab are mounted as root, who is most definitely not allowed to ssh into my server - nor into yours, right??? - and in any event, even if it were, would result in a pretty useless situation as I would have either no access to the directories, or I would have to make them all world-readable, which is a BAD idea at the best of times....)

Using .bashrc is really not an option, as it requires me to launch a terminal session, and then leave it open for the duration of my Gnome session (closing it will automatically umount my drives).

I use Gnome (at home, and KDE at work - still can't quite decide which one is better, and I laugh at all those embroiled in this religious war.... they're both excellent windows managers and leave Windows in a trail of shame and uselessness) so I'd like to have the drives mounted when I start the session, without having to launch a terminall session.

The easy option is to create a simple shell file in my ~/bin directory:
#!/bin/sh
# Mounts external drives on sshfs (not mounted automatically from /etc/fstab)

mount /media/multimedia
mount /media/www

and add it to the session startup scripts for the Gnome session: System > Preferences > Startup Applications

If you now log out and log back in (no need to reboot) you will find your sshfs mountpoints proudly showing in the local directory.

You may also want to consider changing the 'auto' option back to 'noauto' should speed up the boot process.